We know how frustrating it can be to deal with a cutting board that is constantly soaked with juices, causing a messy countertop. That is why we are here to help.
In this article, we’ll show you step-by-step how to make a juice groove in your cutting board. With just a few tools and materials, you’ll be able to create a functional and aesthetically pleasing groove that will keep your kitchen clean and organized.
Let’s get started!
Key Takeaways
- Choose hardwoods like maple, walnut, or cherry for durability and moisture resistance.
- Use a router and a 1/4-inch straight bit for cutting the groove.
- Clean the cutting board with warm soapy water and a sponge before carving the groove.
- Apply a food-safe oil or wax finish to protect the cutting board.
Tools and Materials Needed
We will need the following tools and materials to make a juice groove in a cutting board.

Firstly, it’s important to choose the right wood for your cutting board. Hardwoods like maple, walnut, and cherry are excellent choices due to their durability and resistance to moisture. Avoid softwoods as they can easily scratch and warp.
Next, consider the different types of cutting board finishes available. Food-safe oils like mineral oil and coconut oil are popular choices as they penetrate the wood, providing a protective barrier. Beeswax and carnauba wax can also be used to seal the wood and give it a smooth, shiny finish.
To create the juice groove, you’ll need a few tools. Start with a router and a 1/4-inch straight bit for cutting the groove. A straight edge or a template will help guide the router along a straight line. Additionally, you’ll need sandpaper to smooth the edges and a cloth to apply the chosen finish.
Remember to always wear protective gear like goggles and gloves when using power tools.

Preparing the Cutting Board
Before starting the process, let’s gather all the necessary materials and ensure the cutting board is clean and dry. This will ensure a smooth and successful sanding process.
To prepare the cutting board, follow these steps:
- Start by cleaning the cutting board with warm soapy water and a sponge. Make sure to remove any food particles or stains.
- Rinse the board thoroughly and pat it dry with a clean towel. Allow it to air dry completely before proceeding.
- Once the cutting board is dry, inspect it for any rough spots or splinters. If you find any, use sandpaper to smooth them out. Sand in the direction of the wood grain for best results.
- When selecting the right wood for your cutting board, choose a hardwood like maple or walnut. These woods are durable and resistant to knife marks.
Marking the Juice Groove
Using a pencil, lightly trace along the edge of the cutting board where the juice groove will be located. This step is important because it will serve as a guide for creating the groove.
Here are three different techniques for marking the juice groove on a cutting board:

- Technique 1: Measure and mark the desired width of the groove along the edge of the board using a ruler. Then, use the pencil to lightly trace a line along the marked points, ensuring that it’s straight and even.
- Technique 2: Place a strip of masking tape along the edge of the cutting board where the groove will be. Use the pencil to trace along the edge of the tape, creating a clear and straight line.
- Technique 3: Use a woodworking compass to mark the desired width of the groove. Adjust the compass to the desired width, then place one point on the edge of the cutting board and draw a circle around it.
Carving the Juice Groove
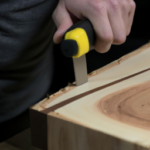
To create the juice groove, we’ll need a chisel and a mallet. Once the design has been marked on the cutting board, we can begin carving the groove.
Start by placing the chisel at one end of the marked groove and tap it gently with the mallet to create the initial cut. Use a combination of downward pressure and gentle taps with the mallet to deepen the groove. Be careful not to apply too much force, as it can cause the wood to splinter or break.
As you progress along the marked line, adjust the angle of the chisel to create the desired depth and width for the groove. Experiment with different carving techniques and design variations to achieve the desired look.
Finishing and Maintenance Tips
Now let’s talk about how we can maintain and finish our newly carved juice groove. Taking care of our cutting board is essential for its longevity and hygiene. Here are some cleaning techniques and tips for choosing the right finish:

- Cleaning Techniques:
- Use warm, soapy water to clean the cutting board after each use.
- Avoid soaking the board in water or putting it in the dishwasher, as it can warp or crack.
- For stubborn stains or odors, sprinkle coarse salt on the board and scrub with a lemon half.
- Rinse the board thoroughly and dry it completely before storing.
- Choosing the Right Finish:
- Food-grade mineral oil is a popular choice for finishing cutting boards as it helps to seal the wood and prevent moisture absorption.
- Alternatively, you can use beeswax and mineral oil mixture for a natural finish.
- Apply the finish in thin, even coats, allowing each coat to dry before applying the next.
Frequently Asked Questions
How Long Does It Typically Take to Make a Juice Groove in a Cutting Board?
To make a juice groove in a cutting board, we use specific tools and follow a step-by-step process. It typically takes about 30 minutes to create a juice groove, but the time may vary depending on the size and depth of the groove.
Can I Use Any Type of Wood for Making a Juice Groove?
Any type of wood can be used to make a juice groove in a cutting board, but some are more suitable than others. Alternatively, you can explore using alternative materials that are specifically designed for this purpose.
Is It Necessary to Wear Protective Gear While Carving the Juice Groove?
We believe it is essential to wear protective gear while carving the juice groove due to the potential risks involved. Safety goggles, gloves, and a dust mask can help prevent injuries and ensure a safe carving process.
Can I Make a Juice Groove on Both Sides of the Cutting Board?
Making a juice groove on both sides of the cutting board offers advantages like increased surface area and convenience. However, there are alternatives, such as using a separate tray, for catching juices while cutting.

How Deep Should the Juice Groove Be in Order to Effectively Catch the Juices?
To effectively catch juices, the groove in a cutting board should be deep enough to prevent spillage. It’s important to clean the board properly, using warm soapy water, and regularly maintain the groove’s integrity by sanding and oiling it.
Conclusion
In conclusion, creating a juice groove in your cutting board is a simple and practical addition that can enhance your cooking experience. By following the step-by-step instructions provided, you can ensure that your cutting board isn’t only functional but also aesthetically pleasing.
Just like a well-prepared meal, a well-crafted juice groove adds that extra touch of perfection, allowing you to focus on the joy of cooking without worrying about any messy spills. It not only elevates the functionality of your cutting board but also keeps your countertops clean and clutter-free. Whether you’re slicing fruits for a refreshing drink or preparing an elaborate dinner, precision matters. Just as the top sugarfree beverage brands have perfected their recipes for taste and health, a quality juice groove is designed with both practicality and elegance in mind.
So grab your tools and get ready to elevate your culinary skills with this easy DIY project.

Susannah expertise lies in researching and compiling evidence-based content on juicing, nutrition, and overall health. She is committed to ensuring that The Juicery World offers accurate, up-to-date, and trustworthy information to empower readers to take control of their health. Susannah’s goal is to inspire individuals to embrace juicing as a way to nourish their bodies and live their best lives.


