
To juice an orange with a juicer, start by washing the fruit thoroughly. Cut the orange in half horizontally and remove any seeds. For an electric juicer, press the orange half onto the reamer and rotate it to extract the juice. If you're using a manual juicer, twist the orange back and forth to get every drop. You can strain the juice for a smoother texture and enjoy it immediately for maximum freshness. There's plenty more to explore!
Key Takeaways
- Wash oranges thoroughly and cut them in half horizontally before juicing.
- Remove any seeds from the orange halves to avoid bitterness in the juice.
- For an electric juicer, press and rotate the orange half on the reamer to extract juice.
- If using a manual juicer, twist the orange back and forth for maximum juice extraction.
- Strain the juice if a smoother texture is desired, then enjoy immediately or store in a glass bottle.
Juicing an orange is a simple and refreshing way to enjoy its vibrant flavor and health benefits. If you're looking to make homemade orange juice, you'll be pleased to know that it's an easy process that can result in a delicious drink packed with vitamin C.
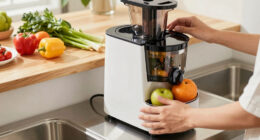
The first step is to wash your oranges thoroughly under running water. This ensures you remove any dirt and debris that may linger on the skin. Once they're clean, you can cut the oranges in half horizontally to expose that juicy flesh, making sure to remove any seeds before you proceed to the juicer.
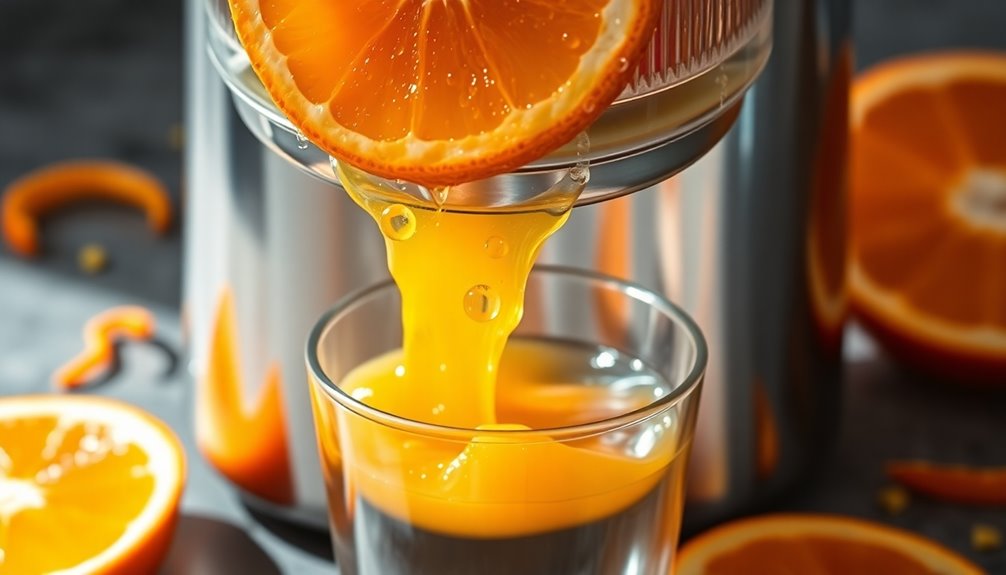
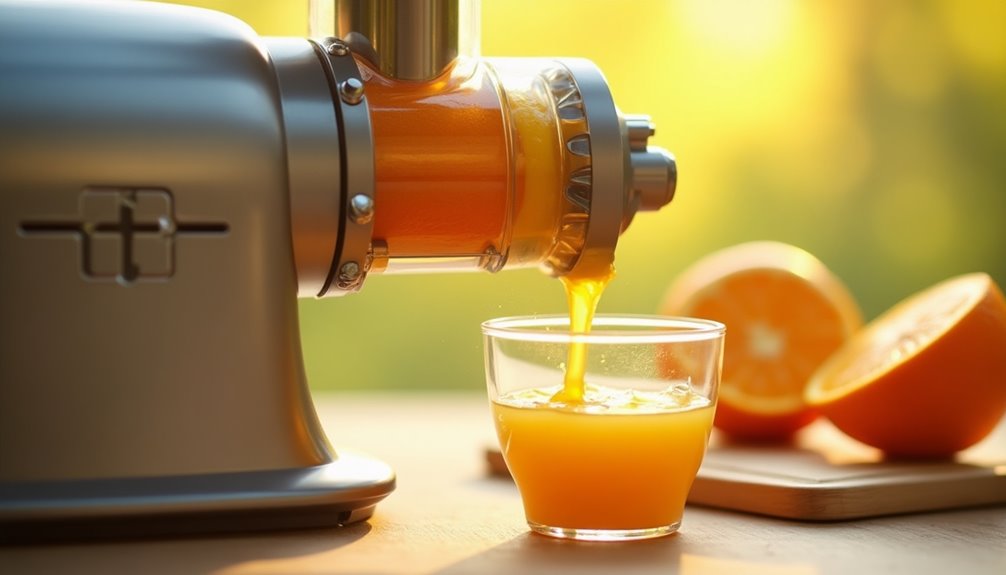
With your oranges halved, it's time to grab your juicer. If you're using an electric juicer, simply press the orange half onto the reamer and hold it down firmly until you've extracted all the juice. Be sure to rotate it to get every last drop.
For those of you who prefer a manual citrus juicer, press and twist the orange back and forth for optimal extraction. This is a great way to engage with the process and feel a sense of accomplishment as you squeeze out fresh orange juice.
If you're using a slow juicer, the method differs slightly. You'll want to peel the oranges first and remove the pith to prevent any bitterness from creeping into your juice. Once peeled, feed the orange segments into the juicer one at a time. This slow extraction method can sometimes yield a more concentrated flavor, so it's worth considering if you're a juice enthusiast.
After juicing, you can strain the juice if you prefer a smoother texture. This is especially helpful if any pulp or small bits have made their way into your juice. Pour the freshly extracted orange juice into a glass bottle.
Enjoying it right away is ideal for the best flavor and nutritional benefits, but if you need to store it, you can keep it in the glass bottle for up to 72 hours.
Drinking fresh orange juice not only satisfies your taste buds but also helps boost your immunity. With vitamin C being a superstar nutrient, you'll feel confident knowing you're refreshing your body with something wholesome.
The bright, zesty flavor of homemade orange juice can provide a delightful pick-me-up any time of day. So next time you have a craving for something refreshing, remember how easy it's to juice an orange and enjoy the delightful health benefits that come with it.
No more store-bought juices filled with preservatives; you can relish in the authentic taste of fresh orange juice right in the comfort of your own kitchen.

Proctor Silex Electric Citrus Juicer Machine, Large 34 oz. Pitcher, Pressure Activated, 2 Reamers for Big and Small Fruit, Pulp Control, for Orange, Lemon, Grapefruit Juice, White & Green (66340)
MAKE FRESH, HEALTHY JUICE: Make fresh juice with oranges, lemons, limes, grapefruits and more. This versatile electric citrus...
As an affiliate, we earn on qualifying purchases.
Frequently Asked Questions
Do You Have to Peel Oranges Before Juicing Them in a Juicer?
You don't necessarily have to peel oranges before juicing them, especially if you're using a juicer designed for whole fruits.
However, peeling can enhance the flavor by reducing bitterness from the peel and pith.
If you're using a slow juicer, it's best to peel the oranges to avoid clogging.
Ultimately, it comes down to your personal preference and the type of juicer you have.
Enjoy experimenting with both methods to find what you like best!
Can You Juice Oranges in a Regular Juicer?
Yes, you can juice oranges in a regular juicer! Just make sure your juicer's designed for citrus fruits or has a reamer attachment for the best results.
Before you start, wash the oranges thoroughly and slice them in half for easier juicing. Remember to remove any seeds to avoid bitterness and protect your juicer.
Avoid using sharp-bladed juicers, as they mightn't extract juice efficiently from soft fruits like oranges. Enjoy your fresh juice!
What Is the Trick to Juicing?
The trick to juicing lies in choosing high-quality fruits, like ripe oranges, which yield more juice.
Always wash them thoroughly to remove any contaminants.
Cut them appropriately based on your juicer type to maximize extraction.
If you're using an electric juicer, press firmly and hold until the juice flow stops.
For slow juicers, peel the oranges to avoid bitterness and feed them in smaller pieces for better processing.
Enjoy your fresh juice!
Is It Worth Juicing Oranges?
Juicing oranges is definitely worth it! You get a delicious, fresh source of vitamin C and antioxidants that can boost your immunity and support your skin health.
When you juice at home, you avoid preservatives and added sugars found in store-bought options, making it healthier. Plus, it's cost-effective, especially if you buy oranges in bulk.
You'll enjoy the vibrant flavors and nutritional benefits while saving money in the long run!

Proctor Silex Alex's Lemonade Stand Electric Citrus Juicer Machine, Large 34 oz. Pitcher, Pressure Activated, for Lemons, Limes and Oranges, 34 oz, Includes 2 Reamers & Recipe Book, Yellow (66341)
FIGHTING CHILDHOOD CANCER ONE CUP AT A TIME: One dollar of every purchase goes directly to Alex's Lemonade...
As an affiliate, we earn on qualifying purchases.
Conclusion
Now that you've juiced your oranges, you can enjoy that refreshing taste like it's 1999! Remember, a good juicer makes this process a breeze, letting you savor the natural sweetness with minimal effort. Whether you're whipping up a morning boost or a zesty cocktail, fresh orange juice is always a winner. So, next time you need a pick-me-up, grab those oranges, fire up your juicer, and let the good times roll!

Elite Gourmet ETS623 BPA-Free 40-Watt Electric Citrus Juicer, Compact, Large Volume, Pulp Control, Oranges, Lemons, Limes, Grapefruits with Easy Pour Spout, 24oz, Black/Stainless Steel
MORE POWER THAN STANDARD 25W MODELS: Equipped with a stronger 40W motor and auto-reversing extraction for faster juice...
As an affiliate, we earn on qualifying purchases.

Elite Gourmet ETS047 BPA-Free 40-Watt Electric Citrus Juicer with 2 Cones, Compact, Large Volume, Pulp Control, Oranges, Lemons, Limes, Grapefruits with Easy Pour Spout, 1.2L, Black/Stainless Steel
SIMPLE HEALTHY JUICING: Press and squeeze fresh juice directly from citrus fruits with no additives, extra sugar or...
As an affiliate, we earn on qualifying purchases.

Cindy thoroughly researches juicing trends, techniques, and recipes to provide readers with practical advice and inspiration. Her writing style is accessible, engaging, and designed to make complex concepts easy to understand. Cindy’s dedication to promoting the advantages of juicing shines through her work, empowering readers to make positive changes in their lives through the simple act of juicing.