TL;DR
A closet rig can make your recordings sound professional by controlling reflections and noise. The key is smart placement, sealing gaps, and ensuring proper ventilation—foam alone won’t cut it. Focus on where sound bounces and how heat escapes.
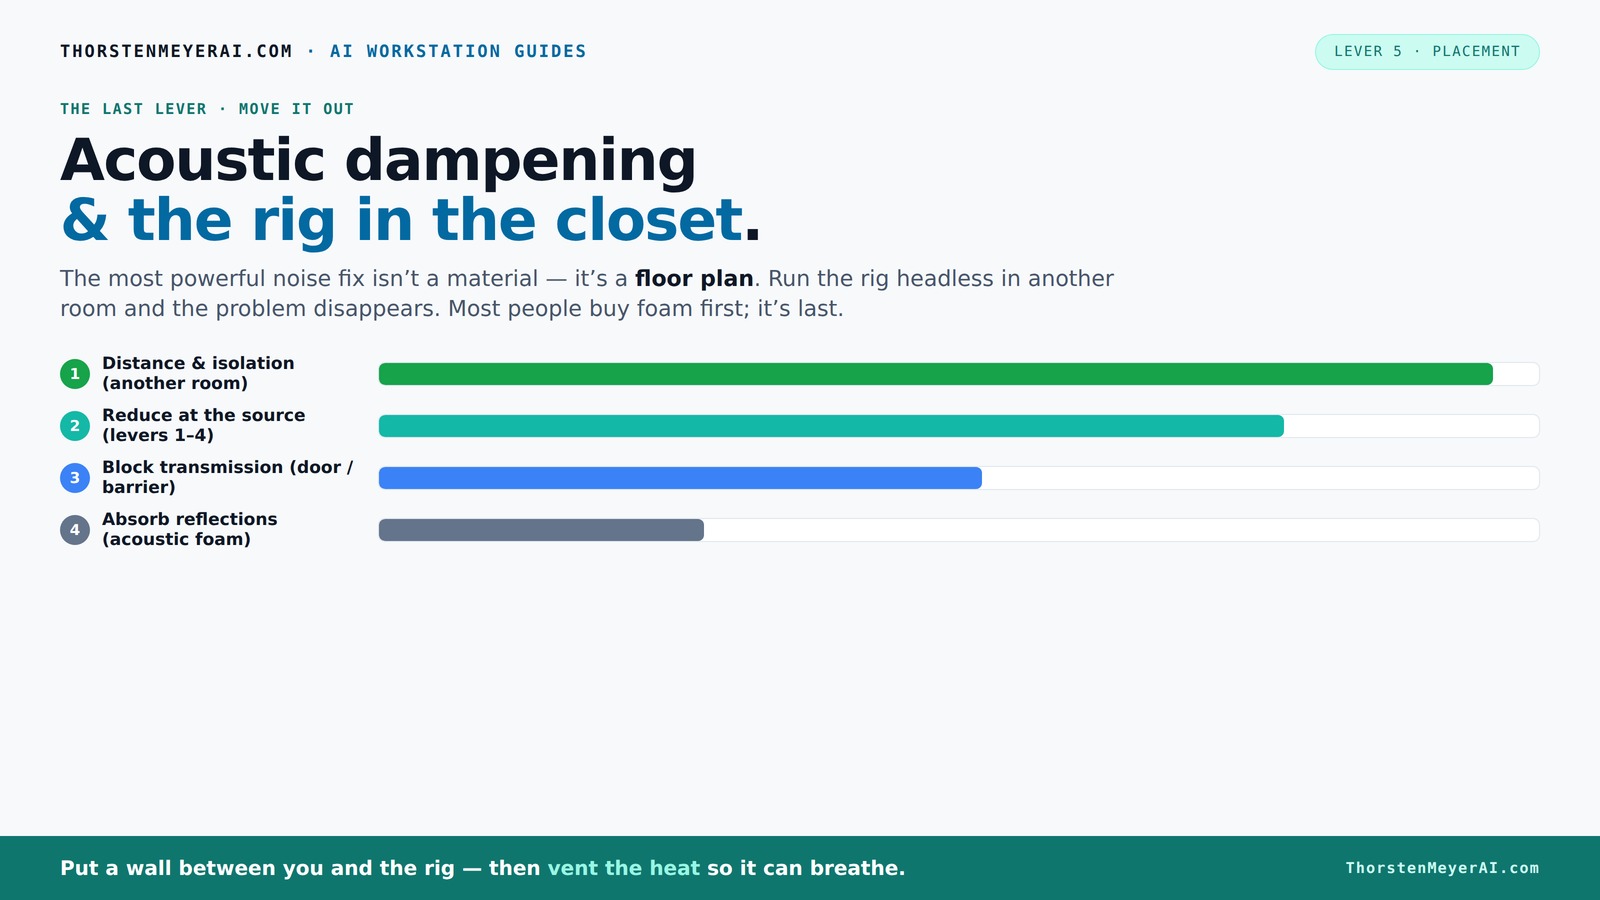
Acoustic dampening
& the rig in the closet.
The most powerful noise fix isn’t a material — it’s a floor plan. A rig you can’t hear because it’s in another room beats any amount of foam. Tap the approaches in Part 1 to see what actually works.
(another room)
(levers 1–4)
(door / barrier)
(acoustic foam)
Contain the noise, not the heat
Key Takeaways
- Treat reflection points—walls, ceiling, and hard surfaces—before focusing solely on corners or foam.
- Sealing gaps and treating the door dramatically reduces sound leaks, often by over 60%.
- Use a combination of dampening materials and proper ventilation to prevent heat build-up in a closet rig.
- Position your mic and treatment based on real reflection points—testing with a mirror helps pinpoint these areas.
- A well-treated, ventilated closet setup can outperform expensive soundproof rooms for voice clarity and noise control.

Focusound 52 Pack Acoustic Foam Panels 1" x 12" x 12" Sound Proof Foam Panles Soundproofing Noise Cancelling Wedge Panels for Home Office Recoding Studio with 300PCS Double-Side Adhesive
Soundproofing - Acoustic foam panels triangular grooves structure for better noise absorption, helps to reduce and absorb unwanted...
As an affiliate, we earn on qualifying purchases.
As an affiliate, we earn on qualifying purchases.
What Exactly Is a Closet Rig and Why Use One?
A closet rig is simply a computer or audio setup placed inside a closet or small enclosed space for better sound control. This approach is popular among home creators and voice over artists because it reduces echo and outside noise. Imagine recording vocals in a small box lined with blankets versus sitting in a large, echo-heavy room. The difference is night and day. The closet acts as a mini studio, focusing sound and cutting down reflections. Plus, it keeps the rig out of sight and reduces noise leakage to the rest of the house. If you’re working with limited space and want clear, dry sound, a closet setup makes perfect sense.
But the key isn’t just hiding your gear. It’s about making the space work for you—controlling how sound bounces around and how heat escapes. This setup works best when you understand the balance between dampening reflections and managing heat buildup. For more tips on optimizing your space, see kitchen and space-saving solutions.

8 Pack - Bass Traps Acoustic Foam Corner, 8''x8''x12'' Black Bass Traps Corner Studio Foam, High Density and Fire-Proof Acoustic Panels Recording Studio Acoustical Treatments
Acoustic Principle- Bass Trap is a kind of sound absorbing structure specially used to absorb specific low-frequency standing...
As an affiliate, we earn on qualifying purchases.
As an affiliate, we earn on qualifying purchases.
Acoustic Dampening vs. Soundproofing — What’s the Real Difference?
Many think acoustic dampening and soundproofing are the same. They’re not. To learn more about how to effectively treat your space, check out acoustic dampening techniques. Acoustic dampening reduces echoes and reflections within a space. It makes the sound inside clearer and less ‘echoey’. Think of soft panels behind your mic or foam on the ceiling. Soundproofing, on the other hand, stops sound from leaking out or coming in. It’s about sealing gaps, thick walls, and barriers that block sound transmission.
For example, hanging blankets over your closet door dampens the echo, but it doesn’t stop sound from escaping if there’s a crack in the door frame. To truly soundproof a closet, you need to seal gaps and add dense barriers. This distinction is vital because many DIYers waste money on foam when they actually need to seal and block leaks first.
Understanding this difference helps you target your efforts—dampening inside reflection, soundproofing for leaks—and prevents wasted effort and money.

Ekkogo Studio Monitor Isolation Pads Premium Acoustic Foam Elevates Audio Ideal for 5 Inch Speakers Enhanced with Vibredux HD Foam for Superior Isolation
【ADVANCED VIBREDUX HD FOAM】: Experience the acoustic excellence of Vibredux HD foam with Ekkogo's Studio Monitor Isolation Pads....
As an affiliate, we earn on qualifying purchases.
As an affiliate, we earn on qualifying purchases.
Placement Secrets: Where Should You Focus Your Treatment?
Placement is everything in a tiny closet. Start by identifying where sound reflects most. The wall behind your mic, the ceiling above, and hard surfaces near your desk are prime reflection points. For detailed strategies, see placement tips and tricks. For example, if you notice your voice sounds boomy or echoey, chances are sound is bouncing off the wall behind you. Adding acoustic panels there can make a huge difference.
Use a mirror trick: stand in front of your mic and move a small mirror along the walls. Wherever you see the reflection of your mic, that’s where you want to treat. The goal is to tame the sound bouncing back and forth.
Don’t forget the door. It’s a weak point for both reflections and sound leaks. Hang a blanket over it or seal gaps with weatherstripping for better isolation. Also, treat the ceiling if it’s a hard surface—sound often ricochets upward and back down.
Finally, treat the floor with a rug or carpet to absorb reflections from below. In small spaces, every hard surface becomes a reflection point, so target those areas first.

Audimute Soundproofing Acoustic Door Seal Kit - Door Sweep and Seal - (Standard Size)
Includes a Door Seal (3/16" x 1/2" x 25') and a Door Sweep (1/2" x 1.5" x 4').
As an affiliate, we earn on qualifying purchases.
As an affiliate, we earn on qualifying purchases.
How to Treat a Tiny Closet: Materials, Strategies, and DIY Hacks
In a small closet, your goal is to absorb reflections without turning it into a heat trap. Start with foam panels—2-inch thick panels are usually enough for small spaces. Place them on the wall behind your mic, the ceiling directly above, and any hard surfaces nearby. For a quick fix, use moving blankets or thick curtains to cover walls and the door.
Seal all gaps in the door frame with weatherstripping or acoustic sealant. This keeps sound in and out, and prevents echo from escaping. For more DIY hacks, visit DIY acoustic treatment tips. For the floor, toss down a thick rug or carpet—every soft surface helps tame reflections.
DIYers often use leftover foam, blankets, and even egg cartons to improvise. The key is placement: test with your voice, then add more treatment where it’s needed most. Remember, thicker panels absorb lower frequencies better, so if you notice a boom on bass notes, consider using 4-inch panels or bass traps.
Ventilation is the next hurdle. A sealed closet traps heat. Add a quiet exhaust fan or vents to keep the temperature stable. You can find small, noise-reducing fans that won’t add to your sound issues. For a detailed look at effective treatment options, check out this guide on [low-noise PC cases and airflow](https://thorstenmeyerai.com/low-noise-pc-cases-airflow/).
The One Big Mistake: Ignoring the Closet Door and Gaps
The most common trap is leaving gaps or untreated doors. Sound leaks through tiny cracks—around hinges, the latch, or the edges. Even a small gap can let a lot of noise escape, defeating your efforts. Seal these with weatherstripping or acoustic sealant. Hang a blanket or foam panel over the door for extra absorption.
One creator found that sealing every crack cut noise leakage by over 60%. It’s simple but often overlooked. Also, treat the door itself—adding mass, like a heavy curtain, helps block sound transmission.
Don’t forget to check for gaps around windows or vents. These tiny openings can sabotage your whole setup. Use draft stoppers or acoustic tape to seal them up.
In tiny spaces, the door is your weak link. Address it thoroughly, and you’ll notice a big difference in clarity and noise reduction.
Ventilation & Heat: Keeping Your Closet Rig Cool and Quiet
Heat buildup is the hidden enemy in a closet rig. A sealed space traps hot air, causing your GPU and CPU to throttle or fans to roar. Learn more about effective ventilation solutions at tiny kitchen and space solutions. To keep things cool, add active ventilation. Think small exhaust fans or ducted airflow systems that pull hot air out and bring in fresh air.
For example, a 600W GPU running continuously can raise the closet temperature by 10-15°C if unventilated. That’s enough to trigger thermal throttling, which makes the fans spin louder. Installing a quiet, thermostatically controlled exhaust fan can prevent this. Check out this [cooling guide](https://thorstenmeyerai.com/liquid-vs-air-cooling-inference-rig/) for more ideas.
If you want a truly quiet, cool setup, consider a custom soundproof cabinet with ducted airflow—these combine acoustic foam with temperature-controlled fans. It’s pricier but keeps your rig cool and silent at the same time.
Remember: ventilation is just as important as dampening. Without it, your rig works against itself, overheating and creating more noise.