

To make mozzarella cheese with lemon juice, heat a gallon of whole milk to 90°F. Stir in 1/3 cup of lemon juice and let it sit for 15-20 minutes for curds to form. Scoot the curds into a microwave-safe bowl, squeezing out excess whey. Microwave for 30 seconds, then knead until smooth and elastic, adding salt to taste. Shape the cheese and chill it in ice water. There's so much more to explore in this easy cheese-making process!
Key Takeaways
- Heat 1 gallon of fresh whole milk to 90°F in a large pot for even curd formation.
- Add 1/3 cup of lemon juice to the heated milk and stir gently for about 30 seconds.
- Let the mixture sit undisturbed for 15 to 20 minutes to allow curds to form.
- Scoop curds into a microwave-safe bowl, squeezing out excess whey, and microwave for 30 seconds.
- Knead and stretch the warm curds until smooth, then chill in ice water for 10 minutes before storing.
Making mozzarella cheese at home is easier than you might think, and with just a few simple ingredients, you can enjoy fresh, delicious cheese in no time. You'll need one gallon of fresh whole milk, which is the foundation of this delightful cheese.
The process begins by heating the milk in a large pot. You'll want to bring it up to 90°F, which is the perfect temperature for the curds to form. Once the milk reaches that temperature, add ½ tablespoon of citric acid or 1/3 cup of lemon juice. Stir gently for about 30 seconds to ensure the citric acid or lemon juice is well mixed into the milk.
After mixing, it's crucial to let the mixture sit undisturbed for about 15 to 20 minutes. During this time, the magic happens: the curds will form and separate from the whey. You'll notice a change in texture, and soon, you'll have distinct curds ready for the next step.
Once you see that the curds have formed nicely, grab a slotted spoon and gently scoop them into a microwave-safe bowl. Be sure to squeeze out any excess whey as you transfer the curds. This step is essential because it helps you achieve the right consistency for your homemade mozzarella.
Now comes the fun part—microwaving the curds. Pop the bowl in the microwave for about 30 seconds. When you take it out, the curds will be warm and pliable, making it easier for you to start stretching them. This is where the texture of your mozzarella really comes to life.
Knead and stretch the curds until they become smooth and elastic. Don't forget to add salt to taste during this process; it enhances the flavor of your cheese and is a crucial component in any cheese recipe.
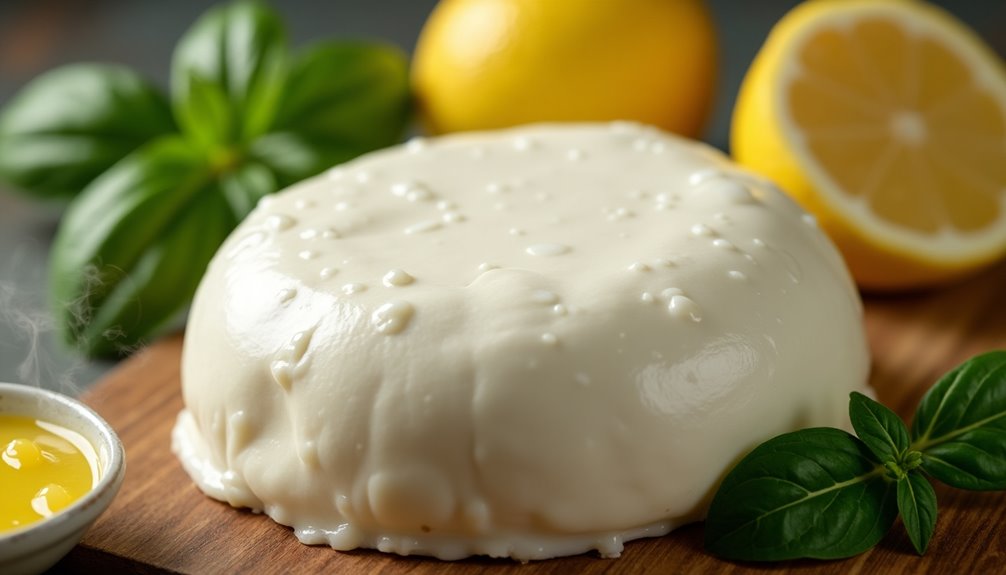
Once your mozzarella has reached that perfect stretchy consistency, you can shape it into balls or any form you desire. This is a chance to get creative!
After shaping, chill the mozzarella in ice water for about 10 minutes. This helps the cheese set and cools it down, making it ready for storage. After chilling, wrap your homemade mozzarella in plastic wrap or store it in an airtight container. You can keep it in the refrigerator for up to 1-2 weeks.
Enjoy your homemade mozzarella cheese in salads, on pizzas, or simply on its own with some fresh basil and olive oil. There's nothing quite like the satisfaction of making cheese from scratch, and with lemon juice as your acid, you've created a delicious variation that's sure to impress.

Cold Press Juicer Machine, 6.5" Large Feed Chute Masticating Extractor, Easy to Clean for Whole Fruits & Vegetables, High Yield
- 3-in-1 Functionality: Juice, nut milks, and sorbets in one machine
- BPA-Free Material: Safe for healthy family treats
- Large 6.5-inch Chute: Fits whole fruits, saves prep time
As an affiliate, we earn on qualifying purchases.
Frequently Asked Questions
Can I Use Lemon Juice Instead of Citric Acid for Mozzarella?
Yes, you can absolutely use lemon juice instead of citric acid for making mozzarella.
Just remember that about 1/3 cup of lemon juice works as a substitute for ½ tablespoon of citric acid. The acidity from the lemon juice helps curdle the milk effectively. If you’re in a pinch and don’t have lemon juice on hand, you can also use lime juice as an alternative, as the acidity levels are quite similar. In fact, knowing how much juice in one lime can be helpful; typically, one lime yields about 2 tablespoons of juice. This means that you can easily substitute lime juice in your recipe for that fresh, tangy flavor while still achieving the desired curdling effect with the milk.
For the best results, use fresh lemon juice, and add it to the milk at the right temperature.
Just be aware that it might add a slight citrus flavor to your cheese!
Can You Use Lemon Juice Instead of Rennet to Make Cheese?
Oh sure, why not just throw some lemon juice in your milk and call it a day?
You can absolutely use lemon juice instead of rennet to make cheese! It's like a tangy little rebel taking charge of your dairy game.
Just remember to add about 1/3 cup per gallon of milk at the right temperature.
You'll get curds forming, though they might taste a bit different.
But hey, who doesn't love a surprise?
What Does Lemon Juice Do in Cheese Making?
In cheese making, lemon juice acts as an acidifying agent that helps curdle the milk. By lowering the pH, it encourages the proteins to coagulate, forming curds while separating from whey.
You'll notice that the citric acid in lemon juice adds a subtle tanginess to the flavor profile.
Plus, if you're looking for a vegetarian option, lemon juice is a reliable substitute for rennet, allowing you to create delicious cheese without animal-derived ingredients.
Is Mozzarella Better With Citric Acid or Vinegar?
Choosing between citric acid and vinegar for mozzarella is like picking between two different paths in a forest; both lead to delicious cheese, but the journey varies.
Citric acid often gives you a smoother, creamier texture, while vinegar can add a distinctive tang.
If you prefer a cleaner flavor, go for citric acid. But if you're looking for something with a bit more character, vinegar might just be your best bet.
Conclusion
Now that you've mastered the art of making mozzarella cheese with lemon juice, you can savor the fruits of your labor. With just a little patience and the right ingredients, you've turned a simple process into a delicious creation. Like a magician conjuring up a rabbit from a hat, you've transformed milk into a creamy, stretchy delight that's perfect for your favorite dishes. So go ahead, impress your friends and family with your newfound cheesy skills!