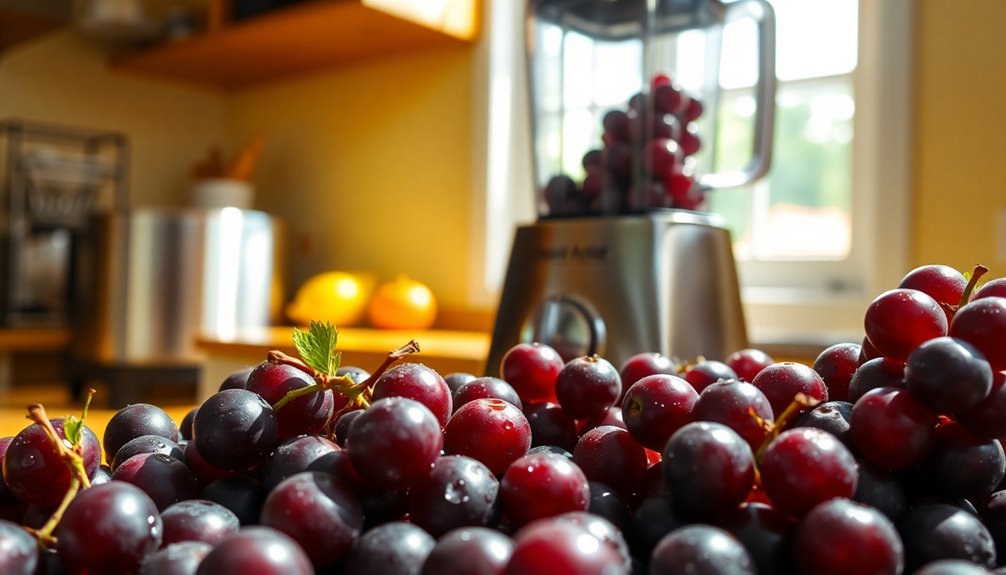
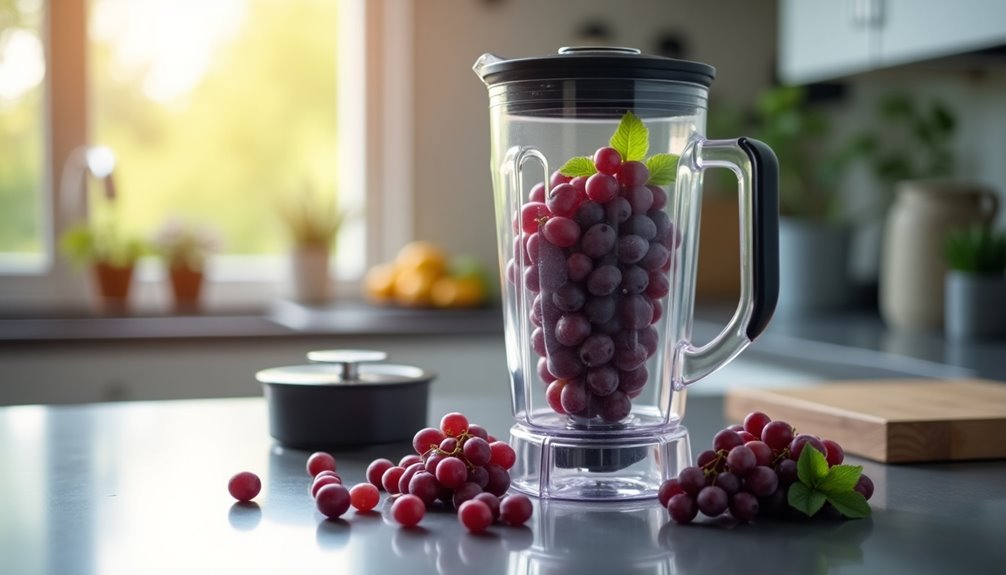
Connect with us

Juice Tips and Tricks

How To Make Grape Juice With A Blender

Published

on

On a sweltering summer day when the sun is blazing high, there’s truly nothing better than sipping on a cool glass of grape juice. However, instead of settling for something off the shelf, you have the option to prepare your very own grape juice right in the comfort of your home using a blender. This approach is not only cost-effective but also allows you to tailor the taste to your personal preference.

Picture this: plump, juicy grapes bursting with sweetness, waiting to be transformed into a delicious drink. With just a few simple steps, you can turn those grapes into a refreshing beverage that’s perfect for any occasion.

Making grape juice with a blender is not only easy, but it’s also a great way to use up extra grapes from the farmer’s market or your own backyard. So grab your blender and let’s get started.

Key Takeaways

  • Choose grapes with desired sweetness and acidity, such as Concord grapes.
  • Use a high-powered blender and blend grapes in smaller batches for a smoother texture.
  • Add a splash of lemon juice to enhance flavor and adjust sweetness with honey or sugar.
  • Strain the mixture through a fine mesh strainer to remove pulp and store the grape juice in an airtight container in the back of the fridge to maintain freshness.

Choose Your Grapes

Grapes are a must-have ingredient when making grape juice, so grab ’em and start blending! When choosing your grapes, remember that different grape varieties have varying levels of sweetness and acidity. Some great options include Concord grapes, Muscadine grapes, and Thompson Seedless grapes.

Additionally, consider your grape color preferences. Red grapes will give your juice a deeper, richer color, while green grapes will result in a lighter, more refreshing juice.

Once you’ve decided on your grape variety and color, it’s time to move onto the next step: washing and preparing your grapes.

Advertisement

Wash and Prepare Your Grapes

Before I can start making grape juice, I need to properly wash and prepare my grapes. This involves removing all the stems and leaves from the grapes, as they can affect the taste and texture of the juice.

I then need to clean and rinse the grapes thoroughly to ensure that they’re free of any dirt or debris.

Removing Stems and Leaves

First, you’ll wanna grab your bunch of grapes and pick off any stubborn stems or leaves that are still attached. This step is crucial to ensure that your grape juice will have a smooth and consistent texture. Here are some tips to make this process easier:

  • Hold the grape bunches under running water to help loosen the stems and leaves.
  • Use a sharp knife or scissors to cut off the stems close to the grapes.
  • Gently rub the grapes between your fingers to loosen any remaining leaves.
  • If you’re using small grapes, you can also try squeezing them gently to remove the stems.

Don’t worry about removing every single stem or leaf, but try to get rid of the majority to avoid any bitter taste in your juice.

Now that you have removed the stems and leaves, it’s time to move on to the next step of the process: cleaning and rinsing the grapes. This step is crucial to remove any dirt, debris, or pesticides that may be present on the surface of the grapes.

Cleaning and Rinsing

Ironically, the key to a healthy and delicious grape juice isn’t the grapes themselves, but rather the cleaning and rinsing process.

Advertisement

Before putting the grapes in the blender, it’s important to clean them thoroughly to remove any dirt, pesticides, or bacteria that may be present. One of the best ways to do this is by using natural cleaning products such as vinegar or baking soda. These products are effective in removing any harmful substances without leaving any residue on the grapes.

When rinsing the grapes, it’s important to take extra precautions to avoid bacterial contamination. One tip is to rinse them under running water for at least 30 seconds, making sure to rub each grape gently to remove any dirt or debris. Another tip is to use a colander or strainer to rinse the grapes, as this will help to remove any excess water and prevent the grapes from becoming waterlogged.

By taking these steps, you can ensure that your grape juice is not only delicious but also safe to drink.

With the grapes cleaned and rinsed, it’s time to add them to the blender and start blending!

Add Grapes to Blender

Now, toss a generous amount of grapes into your blender and get ready to taste the sweet, juicy goodness! But before adding the grapes, make sure your blender is suitable for this task. High-powered blenders, such as Vitamix or Ninja, work best for making grape juice. If you don’t have a high-powered blender, you can still make juice, but the consistency may be a bit chunkier.

Advertisement

When it comes to grape varieties, any type can be used to make juice. However, Concord grapes are the most commonly used for juice because of their intense flavor and high sugar content. Red and green grapes can also be used, but they may produce a lighter-colored juice.

Once the grapes are in the blender, you’re ready to move on to the next step of blending them into a smooth liquid.

Blend Grapes

To achieve a smoother texture, it’s advisable to blend the grapes in smaller batches. Blending techniques play a crucial role in ensuring that the grape juice is smooth and free of lumps. When blending, it’s important not to overload the blender with too many grapes at once.

Start by adding a few grapes, then gradually increase the amount until all the grapes are blended. Here are some tips to make your blending experience more enjoyable:

  • Use ripe grapes for a sweeter taste
  • Add a splash of lemon juice to enhance the flavor
  • Experiment with different grape juice recipes to find your favorite combination

By following these tips, you’ll be able to create a delicious and refreshing grape juice that’s perfect for any occasion. Once the grapes are blended to your desired consistency, the next step is to strain the grape mixture.

Strain Grape Mixture

To strain the grape mixture, I first choose a fine mesh strainer that’ll effectively remove the pulp and keep the juice. I prefer using this type of strainer. Once I have my strainer ready, I pour the grape mixture through it. Then, I press down on the pulp with a spoon or spatula to extract as much juice as possible.

Advertisement

Make sure to leave a double new line after every complete sentence.

Choosing a Strainer

After blending the grapes, it’s important to choose a strainer that will effectively remove any unwanted seeds or pulp from the juice. Here are some things to consider when selecting a strainer:

  1. Types of strainers: There are several types of strainers available, including mesh strainers, cheesecloth, and nut milk bags. Mesh strainers come in different sizes and can be made of plastic or metal. Cheesecloth is a thin, cotton fabric that is available in different grades. Nut milk bags are made of a fine mesh material and are designed for straining nut milk, but can also be used for juicing.

  2. Pros and cons of different strainer materials: Mesh strainers made of plastic are affordable and easy to clean, but may not be as durable as metal ones. Metal strainers are more durable but can be more expensive. Cheesecloth is inexpensive and versatile but can be difficult to clean. Nut milk bags are easy to clean and reusable, but may not be as effective at removing pulp as other types of strainers.

  3. Personal preference: Ultimately, the type of strainer you choose will depend on your personal preference and the amount of time you want to spend straining the juice. Experiment with different types of strainers to find the one that works best for you.

Choosing the right strainer is an important step in making grape juice with a blender. Once you’ve selected the strainer that works best for you, it’s time to move on to the next step: straining the grape pulp.

Straining Grape Pulp

Now that we’ve chosen a suitable strainer, it’s time to move onto the next step in making grape juice with a blender. We need to strain the grape pulp from the juice.

To do this, we’ll need to pour the blended grapes through the strainer and use a spatula or spoon to press the pulp against the mesh to extract as much juice as possible.

Advertisement

After straining the grape pulp, you may be left wondering what to do with it. Don’t throw it away just yet! There are many uses for grape pulp, such as making jams, jellies, and even grape pulp recipes like grape muffins or grape bread. The pulp is also rich in fiber and antioxidants, making it a healthy addition to any recipe. So, before discarding the pulp, consider using it in one of these creative ways.

Now that we’ve strained the grape pulp, we can move on to the final step in making grape juice – sweetening it to taste.

Sweeten to Taste

Adjusting the sweetness of your grape juice is a matter of personal preference. Some people like their juice tangy and tart, while others prefer it sweeter. To sweeten your grape juice, you can add honey or sugar. Here are some tips for getting the perfect sweetness:

  1. Start small: When adding sweeteners to your grape juice, it’s best to start with a small amount and taste as you go. You can always add more, but it’s difficult to take away sweetness once it’s been added.

  2. Use alternative sweeteners: If you’re looking for a healthier alternative to sugar, try using honey, maple syrup, or agave nectar. These sweeteners are more natural and have a lower glycemic index than white sugar.

  3. Consider the type of grapes: Some grapes are naturally sweeter than others. If you’re using very sweet grapes, you may not need to add any additional sweeteners.

Once you’ve adjusted the sweetness of your grape juice to your liking, it’s time to chill it.

Chill Your Grape Juice

Now that I’ve made grape juice with my blender, it’s time to chill it. Refrigerating the juice is essential to keep it fresh for longer periods.

Advertisement

I usually pour the juice into a glass jar and place it in the refrigerator for a couple of hours before drinking. If I want my juice extra cold, I’ll add some ice cubes before drinking.

Refrigerating Your Juice

After blending your grapes, it’s important to refrigerate your juice to maintain its freshness and taste. Here are some tips for storing fresh juice in your refrigerator:

  • Store your grape juice in an airtight container to prevent it from absorbing any odors from other foods in your fridge.
  • Keep your grape juice in the back of the fridge where it’s the coldest, away from the door where temperature fluctuations can occur.

Homemade grape juice can last up to 5 days in the refrigerator, but it’s best to consume it within 2-3 days for optimal freshness. If you notice any signs of spoilage, such as a foul odor or mold, discard the juice immediately.

Before drinking your grape juice, give it a good shake or stir to evenly distribute any sediment that may have settled at the bottom of the container.

Now that your grape juice is chilled and ready to go, it’s time to add some ice for a refreshing summer drink.

Adding Ice

To cool down your summer beverage, simply plop a few ice cubes into your glass and watch as the heat melts away like a popsicle on a hot July day. But if you want to take your grape juice to the next level, consider adding some blended ice.

Advertisement

Blending ice cubes into your grape juice not only cools it down, but it also adds a slushy texture that can make you feel like you’re sipping on a fancy frozen drink. When blending ice into your grape juice, it’s important to use the right blending techniques.

Start by adding a few ice cubes to your blender and pulsing it a few times until the ice is chopped up into small pieces. Then, gradually add in your grape juice and blend until the ice is fully incorporated. If you want to get creative, you can also try adding in alternative ingredients like frozen berries or sliced bananas for a fruity twist.

Once your blended grape juice is ready, serve and enjoy!

Serve and Enjoy

Once the grape juice is ready, simply pour it into glasses and savor the refreshing taste. To enhance the experience, consider some creative serving ideas and pairings with food. For instance, you can add a slice of lime or lemon to the glass to give the juice a citrusy twist. Alternatively, you can mix the grape juice with other fruit juices such as orange or pineapple for a more complex flavor profile.

When it comes to pairing grape juice with food, the options are endless. You can serve it with cheese, crackers, and charcuterie for a sophisticated appetizer. Or, you can pair it with a light salad or seafood dish for a healthy and refreshing meal. Whatever your choice, make sure to enjoy the grape juice in good company and in a relaxing environment.

Advertisement

To store your grape juice, follow the next subtopic on how to keep it fresh for longer periods.

Store Your Grape Juice

Now that you’ve enjoyed your freshly made grape juice, it’s time to think about how to store the remaining juice. Proper storage is important to preserve the freshness and taste of the juice for a longer period. Here are some tips and preservation techniques to help you store your grape juice:

  • Refrigerate: Store the grape juice in the refrigerator immediately after making it. Keeping it at a temperature between 32-40°F will help to maintain its freshness and quality for up to 5-7 days.

  • Use airtight containers: Transfer the grape juice to an airtight container or bottle before storing it in the refrigerator. This will prevent the juice from oxidizing and losing its flavor.

  • Freeze: If you’re not planning to consume the grape juice within a week, you can freeze it for up to 6 months. Pour the juice into freezer-safe containers or ice cube trays and place them in the freezer.

By following these storing tips and preservation techniques, you can enjoy your homemade grape juice for a longer period. Now that you know how to store your grape juice, let’s move on to the next section where we’ll discuss how to experiment with flavors to create unique and delicious blends.

Experiment with Flavors

Don’t be afraid to mix things up and try new flavors when creating your own unique blends of juice. One of the best things about making grape juice with a blender is that you can experiment with different flavor combinations until you find the perfect one.

For example, you can add a splash of lemon juice to your grape juice to give it a tangy twist. Alternatively, you can add a few sprigs of fresh mint to give your juice a refreshing herbal flavor.

Advertisement

Once you’ve created your own flavor combinations, it’s important to do some taste testing to make sure your juice is just right. Take a small sip of your juice and pay attention to the flavor profile. Is it too sweet? Too tart? Too bitter? Adjust the flavors as needed until you achieve the perfect balance.

With a little bit of experimentation and taste testing, you can create your own unique and delicious grape juice blends that you’ll love to drink again and again.

Frequently Asked Questions

Can I use frozen grapes for grape juice?

Yes, frozen grapes can be used for grape juice. Benefits include convenience and longer preservation. However, drawbacks include a less fresh taste and altered texture. Consider using alternative fruits for homemade juice, such as strawberries or blueberries.

How long does it take to blend the grapes into juice?

Blending time for grape juice varies based on grape quality and desired consistency. Fresh, ripe grapes will blend faster than frozen or less ripe grapes. Expect blending to take 1-2 minutes.

Do I need to remove the stems from the grapes before blending them?

Yes, it’s best to remove the stems from the grapes before blending them. Leaving the stems on can result in a bitter taste in the juice. To remove stems, use a sharp knife or grape stemmer.

Advertisement

What is the best type of blender to use for making grape juice?

The best blender types for making grape juice are high-powered blenders with a minimum of 1000 watts. A powerful motor ensures that the grapes are well blended and the juice is smooth.

Can I use honey or another sweetener instead of sugar to sweeten my grape juice?

When making grape juice, honey can be used as a nutritive sweetener instead of sugar. Non-nutritive sweeteners may also be used, but the taste may be affected. Experiment with different sweeteners to find what works best for your taste preference.

Conclusion

In conclusion, making grape juice with a blender is an easy and delicious way to enjoy the many health benefits of grapes. Whether you prefer sweet or tart grapes, you can choose any variety you like to create a refreshing and nutritious drink.

Remember to wash and prepare your grapes before blending, and strain the mixture to remove any pulp or seeds. You can also experiment with different flavors, such as adding lemon or mint for a unique twist.

One example of the benefits of grape juice is a study conducted by the University of Leeds, which found that consuming grape juice can lower blood pressure and reduce the risk of heart disease. This highlights the importance of incorporating grape juice into your diet as part of a healthy lifestyle.

Advertisement

By making your own grape juice with a blender, you can control the ingredients and ensure that you’re getting the maximum health benefits from this delicious drink. So go ahead and give it a try – your taste buds and your body will thank you!

Cindy thoroughly researches juicing trends, techniques, and recipes to provide readers with practical advice and inspiration. Her writing style is accessible, engaging, and designed to make complex concepts easy to understand. Cindy's dedication to promoting the advantages of juicing shines through her work, empowering readers to make positive changes in their lives through the simple act of juicing.

Continue Reading
Advertisement

Juice Tips and Tricks

How Do You Get Grape Juice Out Of Clothes

Published

on

By

We have all been there: enjoying a delicious glass of grape juice when suddenly it spills on our clothes. It can be frustrating and seem difficult to clean, but fret not! With the right steps, getting rid of grape juice stains from your clothing can be a breeze.

First, it’s important to act quickly. As soon as the spill happens, grab a cloth and begin blotting the stain. The longer the juice sits, the harder it will be to remove.

Once you’ve blotted as much of the juice as possible, it’s time to move onto the next step: rinsing with cold water.

Keep reading to learn the rest of the steps to effectively remove grape juice stains from your clothes.

Key Takeaways

  • Act quickly to remove grape juice stains from clothing
  • Soak in cold water and vinegar for at least 30 minutes
  • Use stain remover and check care label before washing
  • Prevention is key: use stain-resistant fabric spray and wear bib/apron when drinking grape juice

Blot the Stain Immediately

Don’t panic, just grab a paper towel and blot that grape juice stain ASAP! Blotting techniques are essential to get as much of the stain out as possible before it sets in.

Start by gently blotting the stain with a clean and dry paper towel. Avoid rubbing the stain as it can spread the grape juice further into the fabric. Instead, press down on the stain to absorb as much of the juice as possible.

Advertisement

The importance of quick action can’t be stressed enough. The longer you wait to treat the stain, the harder it’ll be to remove.

If you’re out and about and don’t have access to a paper towel, you can use a cloth napkin, a tissue, or even a slice of bread to blot the stain.

Once you’ve blotted the stain as much as possible, move on to the next step and rinse the fabric with cold water.

Rinse with Cold Water

First, start by running icy water over the stained area to prevent the juice from setting into the fabric like a stamp on an envelope. It’s important to use cold water instead of warm or hot water because heat can actually set the stain permanently.

Here are four benefits of using cold water for stain removal:

Advertisement
  1. Cold water helps to prevent the stain from spreading.
  2. It helps to loosen the stain from the fabric.
  3. It’s gentle on the fabric and won’t cause damage.
  4. It’s easily accessible and doesn’t require any special equipment.

To properly rinse clothing for stain removal, hold the stained area under a faucet or use a bowl of cold water to pour over the stain. Make sure the water is running through the back of the fabric to push the stain out instead of pushing it further into the fibers.

Once you’ve rinsed the area thoroughly, move on to applying a stain remover.

Applying a stain remover is the next step in removing grape juice from clothes.

Apply a Stain Remover

When it comes to removing tough stains like grape juice from clothes, I’ve found that applying a stain remover can be really helpful.

There are two options when it comes to stain removers: you can use a commercial product or make your own at home.

Commercial stain removers can be found at most stores and are specifically designed to tackle tough stains, while making your own can be a more natural and cost-effective option.

Advertisement

Use a Commercial Stain Remover

To effectively remove grape juice stains from your clothes, you can try using a commercial stain remover that’s specifically designed for tough stains. There are many benefits to using natural stain removers, but sometimes a commercial product is necessary for those stubborn stains.

When choosing a commercial stain remover, it’s important to compare the effectiveness of different products. Look for one that’s specifically designed for removing grape juice stains and has good reviews from other users.

When using a commercial stain remover, always follow the instructions on the label. Apply the remover directly to the stain and let it sit for the recommended amount of time. Then, wash the garment in the washing machine as usual.

If the stain is still visible, repeat the process or try a different product. If you prefer to make your own stain remover, there are several options you can try.

Make Your Own Stain Remover

If you’re feeling crafty, whip up your own stain remover using DIY stain remover recipes that use natural stain removal techniques.

Advertisement

One common recipe is to mix equal parts baking soda and water to form a paste. Spread the paste on the stained area, let it sit for 30 minutes, and then rinse it off with cold water.

Another recipe is to mix 1/4 cup of white vinegar, 1 tablespoon of dish soap, and 2 cups of water. Apply the mixture to the stain, let it soak for 15 minutes, and then rinse it off with cold water.

These DIY stain remover recipes are effective, affordable, and eco-friendly. They use simple ingredients that you probably already have in your kitchen, and they don’t contain any harsh chemicals.

So next time you spill grape juice on your clothes, don’t panic. Just mix up a batch of DIY stain remover and treat the stain with natural stain removal techniques.

Once you’ve applied the stain remover, move on to the next step: soak the stain in cold water for at least 30 minutes to help lift the remaining stain from the fabric.

Advertisement

Soak the Stain

First, try soaking your stained clothes in cold water and vinegar to help lift the grape juice from the fabric. This is one of the pre-treatment options that you can do before washing your clothes.

Simply fill a basin or sink with cold water and add a cup of vinegar. Then, place the stained clothing into the water and let it soak for at least 30 minutes. The vinegar will help break down the stain while the cold water prevents the stain from setting further into the fabric.

If the grape juice stain is particularly stubborn, you may need to try alternative stain removal techniques such as using a specialized stain remover or laundry detergent. However, before trying any harsh chemicals on your clothing, always refer to the manufacturer’s instructions and test on a small, inconspicuous area first.

Once you have successfully soaked and treated the grape juice stain, it is time to wash the clothing as usual.

Wash the Clothing

Now it’s time to toss those stained clothes in the washing machine and say goodbye to that pesky grape juice stain for good! But wait, before you do that, it’s important to know some stain removal and laundry techniques to ensure that the stain is completely removed.

Advertisement

First, check the care label on your clothing to determine the appropriate water temperature and washing cycle. Then, pretreat the stain with a stain remover or laundry detergent before placing it in the machine. For tougher stains, you may need to soak the clothing in a mixture of warm water and laundry detergent for a few hours before washing.

To better understand how to remove grape juice stains, take a look at the table below. It provides a quick and easy guide on how to treat stains based on the type of fabric.

Fabric Type Treatment
Cotton Pretreat with laundry detergent and wash on warm
Synthetic Pretreat with stain remover and wash on cold
Wool Soak in cold water and use a wool-specific stain remover before washing on cold
Silk Spot clean with a gentle fabric cleaner and air dry

Now that you know how to properly wash your stained clothing, it’s time to check the stain after washing to ensure that it’s completely gone.

Check the Stain

After tossing your stained clothing in the washing machine, don’t forget to double-check for any lingering traces of the grape juice stain.

Grape juice stains are notorious for being difficult to remove, so it’s important to identify any remaining marks before putting the clothing in the dryer. To identify grape juice stains, look for a dark purple or red spot on the fabric. The stain may also feel sticky or have a sweet smell.

Advertisement

When dealing with grape juice stains, it’s important to take precautions to avoid spreading the stain. Avoid rubbing the stain, as this can cause it to spread and set deeper into the fabric. Instead, gently blot the stain with a clean cloth or paper towel to remove as much of the juice as possible.

If the stain is still visible, apply a stain remover or a mixture of vinegar and baking soda before washing the clothing again. With these precautions in mind, you can successfully remove grape juice stains from your clothing.

Moving on to the next step, repeating the process, it’s important to continue checking for any remaining traces of the stain until it is completely gone.

Repeat the Process

To ensure that every last bit of the grape juice stain is removed, I suggest checking the clothing and repeating the process until the fabric is completely clean and free of any lingering marks. Repetition benefits the cleaning process, as it gives the cleaning agent enough time to work on the stain and break it down.

If the first attempt does not fully remove the grape juice stain, try applying the cleaning solution again and letting it sit for a longer period of time. Alternatively, you can also try using a different cleaning solution, such as rubbing alcohol or white vinegar, to remove the grape juice stain from the clothing.

Advertisement

Make sure to spot test the solution on an inconspicuous area of the fabric before applying it to the stained area. Once the grape juice stain is removed, it’s important to dry the clothing properly to prevent any mildew or mold growth.

Dry the Clothing

Once the stain has been fully removed, make sure to properly dry the clothing to avoid any potential for mildew or mold growth. It’s better to be safe than sorry! When it comes to drying grape juice stains on clothes, there are two main options: air dry or tumble dry.

Air drying can be a great option for delicate fabrics or if you’re worried about shrinkage. Simply lay the garment flat on a clean towel and let it dry naturally. However, if you’re in a rush or prefer to use a dryer, tumble drying can also work well. Just make sure to use a low heat setting and avoid over-drying the clothing.

Best Techniques for Drying Grape Juice Stains on Clothes Tips for Preventing Grape Juice Stains from Setting in Clothes
Option 1: Air dry Use a stain-resistant fabric spray before wearing clothes
Lay garment flat on clean towel Use a bib or apron when drinking grape juice
Allow to dry naturally Treat stains as soon as possible
Option 2: Tumble dry Blot stains with a clean cloth or paper towel before washing
Use a low heat setting Avoid rubbing stains, as this can push them further into the fabric

After drying the clothing, it’s important to check for any residual stains. Even if the stain appears to be fully removed, it’s possible that some pigment may still be present. In the next section, we’ll explore techniques for ensuring that the stain is completely gone.

Check for Residual Stains

Make sure you don’t miss this crucial step – checking for any remaining stains on your clothing after removing grape juice stains. Grape juice stains can come in different types, such as fresh or dried, and they can be quite stubborn to get rid of.

Advertisement

Even if you think you’ve successfully removed the grape juice stain, it’s important to check for any residual stains that may still be present. The importance of checking for residual stains lies in preventing the stain from becoming permanent. If left untreated, the stain may set in and become more difficult to remove.

So, make sure to examine your clothing thoroughly for any remaining grape juice stains before proceeding to the next step. Speaking of which, let’s move on to some prevention tips to avoid getting grape juice stains in the first place.

Prevention Tips

Want to avoid getting those pesky purple stains on your favorite clothes? Here are some tips to prevent grape juice stains from happening in the first place!

First, consider investing in stain-resistant fabrics. These fabrics are designed to repel liquids and prevent stains from setting in. Look for clothing made from materials like polyester or nylon, which are known for their stain resistance properties.

If you do find yourself in a situation where grape juice is the only option, try using grape juice alternatives like cranberry or pomegranate juice. These juices have a similar taste and color to grape juice but are less likely to leave behind stains.

Advertisement

Another option is to dilute the grape juice with water to reduce its staining potential. And if all else fails, be sure to treat any stains immediately with a stain remover before washing the garment.

Frequently Asked Questions

Can grape juice stains be removed from all types of fabrics?

Fabric compatibility is key when removing grape juice stains. There are alternative solutions for each type of fabric, but it’s important to act fast. With attention to detail, any stain can be removed with ease.

How long should the stain be soaked in stain remover before washing?

When it comes to removing tough stains from clothes, stain remover effectiveness and soaking time are key. It’s important to follow the instructions on the product, but I’ve found that soaking for at least 30 minutes before washing yields the best results.

What is the best type of stain remover to use for grape juice stains?

When dealing with grape juice stains, chemical stain removers tend to be more effective than natural ones. However, DIY options like vinegar or baking soda can work well if used immediately and in large quantities.

Can hot water be used to rinse out the stain instead of cold water?

As the saying goes, "hot water sets stains."Using hot water for grape juice stains can actually make it worse. It’s best to pre-treat the stain before washing with cold water and stain remover.

Advertisement

How can I prevent grape juice stains from occurring in the first place?

To prevent grape juice stains, I avoid wearing light-colored clothes while drinking it. If spilled, I immediately blot the stain with a paper towel and apply a mixture of vinegar and dish soap. Alternative solutions include using a stain repellent spray or wearing a bib.

Conclusion

Well, that was quite a spill! I was enjoying a nice glass of grape juice when suddenly, it ended up all over my shirt. Luckily, I remembered the steps to remove the stain.

First, I made sure to blot the stain immediately with a clean cloth to absorb as much of the juice as possible. Then, I rinsed the affected area with cold water to prevent the stain from setting in.

Next, I applied a stain remover and let it sit for a few minutes before soaking the stain in cold water overnight. The next day, I washed the clothing in the washing machine and repeated the process if necessary.

Once the stain was removed, I made sure to dry the clothing thoroughly and checked for any residual stains.

Advertisement

In the future, I’ll be sure to use a bib or be more careful when drinking grape juice to prevent any more spills. But for now, I’m happy to have successfully removed the stain thanks to these helpful steps.

Continue Reading

Juice Tips and Tricks

How Much Juice Does 1 Lime Make

Published

on

By

As a lover of all things citrus, I often find myself pondering the incredible amount of juice that can be extracted from just one lime. Whether I’m making a refreshing margarita or adding a zesty kick to my favorite recipes, understanding the juice capacity of a single lime is essential for the success of my culinary endeavors.

That’s why I’ve delved deep into the factors that affect lime juice yield, as well as tips for getting the most juice out of my limes.

In this article, I’ll share my findings on how much juice to expect from one lime, as well as the methods I’ve found to be most effective for maximizing lime juice yield. I’ll also explore the various uses of lime juice in cooking and cocktails, as well as the health benefits of incorporating lime into your diet.

Whether you’re a seasoned chef or a home cook looking to elevate your culinary game, this article is for you. So, grab a lime and let’s get started!

Key Takeaways

  • The yield of lime juice varies based on ripeness, size, and juicing technique.
  • Rolling or microwaving the lime can increase juice yield.
  • Using a citrus press or hand juicer is the best method for extraction.
  • Riper and larger limes, as well as applying more pressure when squeezing, result in more juice extraction.

Understanding the Factors that Affect Lime Juice Yield

You might be surprised to learn that the amount of juice a lime produces can vary based on a variety of factors. One of the main factors that affects lime juice yield is the ripeness of the lime. Overripe limes tend to have less juice and a higher acidity level, while underripe limes may be harder to juice and have a lower acidity level.

Another factor that affects lime juice yield is the size of the lime. Generally, larger limes produce more juice than smaller limes, but this can also depend on the specific variety of lime. Additionally, how much pressure you apply when squeezing the lime can also impact how much juice you’re able to extract.

Advertisement

It’s important to note that the acidity levels of the lime juice can also be affected by the extraction process. With these factors in mind, it’s clear that the amount of juice you can get from one lime can vary. However, understanding these variables can help you maximize the amount of juice you can extract.

Now, let’s dive into the average amount of juice in one lime.

Average Amount of Juice in One Lime

When slicing open a lime, you’ll find a tiny oasis of tangy liquid waiting to burst forth. But just how much juice can you expect to get out of one lime? Here are three key things to consider:

  1. The size of the lime. Like any fruit, the size of a lime can vary, which means the amount of juice inside can vary as well. Generally speaking, the bigger the lime, the more juice it will contain.

  2. The ripeness of the lime. A ripe lime will be softer and more yielding to pressure, which means it’ll likely contain more juice than an unripe lime.

  3. The juicing technique used. There are several ways to extract juice from a lime, including manual squeezing, using a citrus press, or even using a blender. Different techniques may yield different amounts of juice, so it’s worth experimenting to find the method that works best for you.

When it comes to lime juice recipes, knowing how much juice you can get from one lime can be crucial for getting the right flavor balance in your dish. But getting the most juice out of your lime takes more than just slicing it open and squeezing. Here are some tips for maximizing your lime juice yield:

  • Before juicing, roll the lime on a hard surface using the palm of your hand. This’ll help break down the membranes inside the lime and release more juice.

Tips for Getting the Most Juice Out of Your Lime

Maximizing the amount of lime juice extracted can be achieved by rolling the fruit on a hard surface prior to juicing. This process helps to break down the membranes within the lime, which allows for more juice to flow out.

Another tip is to microwave the lime for 10-15 seconds before juicing it. This method helps to soften the fruit, making it easier to extract more juice.

Advertisement

It’s also important to use the right juicing equipment. A citrus press or hand juicer is best for extracting the most juice from a lime. Avoid using a blender or food processor as they tend to destroy the membranes within the lime, resulting in less juice.

If you don’t have a lime on hand, citrus fruit alternatives like lemons and oranges can be used as substitutes in most recipes. These fruits have similar acidity levels and can provide a similar flavor profile when used in cooking and cocktails.

Using lime juice in cooking and cocktails can add a bright and tangy flavor to your dish or drink. Incorporating fresh lime juice into guacamole, salsa, or ceviche can elevate the dish to a new level. In cocktails, lime juice is a key ingredient in classics like the margarita and the mojito.

By following these tips for getting the most juice out of your lime, you can ensure that your dishes and drinks have the perfect amount of lime flavor.

Using Lime Juice in Cooking and Cocktails

Incorporating fresh lime juice into your favorite salsa recipe can add a zesty and refreshing twist to your next party dish. But did you know that lime juice also has culinary benefits beyond just adding flavor?

Advertisement

Lime juice is a key ingredient in many cooking recipes and mixology techniques, from marinades and dressings to cocktails and spritzers. When it comes to cooking with lime juice, it’s important to note that lime juice is highly acidic and can quickly overpower other flavors if not used in moderation. However, when used correctly, it can enhance the overall flavor profile of a dish.

For example, a simple marinade made with lime juice, olive oil, and spices can transform a plain chicken breast into a flavorful and juicy dinner option. And for those who love to experiment with mixology, lime juice is a staple ingredient in many classic cocktails such as margaritas and mojitos. Its tart and tangy flavor is the perfect complement to tequila, rum, and other spirits.

As you can see, incorporating lime juice into your cooking and mixology repertoire can open up a whole new world of flavors. But lime juice also has health benefits that make it a valuable addition to any diet.

[Transition to next subtopic about health benefits of lime juice].

Health Benefits of Lime Juice

You may not realize it, but adding a splash of lime to your drink or dish is like giving your body a refreshing splash of vitamins and nutrients. Just as a gardener adds lime to the soil to help plants grow, you can add lime to your diet to help your body thrive.

Advertisement

Lime juice is a great source of vitamin C, which helps boost your immune system and fight off infections. Additionally, lime juice contains antioxidants that can help protect your body against harmful free radicals.

Incorporating lime juice into your diet is a great way to not only add flavor to your recipes, but also to reap the nutritional benefits. Here are some nutrition facts about lime juice:

  • One lime contains approximately 20% of the daily recommended value of vitamin C
  • Lime juice can aid in digestion and may help prevent constipation
  • The citric acid found in lime juice can help prevent kidney stones
  • Lime juice has been shown to have anti-inflammatory properties

Incorporating lime juice into your recipes can be as simple as adding a squeeze of fresh lime to your water or using it as a marinade for your grilled chicken. But, did you know that lime juice can also be used for non-culinary purposes?

Let’s explore some of the other uses for lime.

Other Uses for Lime

I’d like to discuss some other uses for lime beyond its health benefits.

Firstly, lime zest can add a bright, citrusy flavor to both sweet and savory dishes.

Advertisement

Secondly, lime essential oil can be used in aromatherapy to promote relaxation and reduce stress.

Finally, lime juice can also be used as a natural household cleaner due to its acidic properties.

Zest

The zest of a lime can add a burst of tangy flavor to any dish. Here are three ways you can use lime zest recipes to enhance your dishes:

  1. Use it as a garnish: Sprinkle lime zest over salads, pastas, or soups to add a pop of color and flavor.

  2. Incorporate it into marinades: Add lime zest to your marinade mix to infuse your meat, fish, or vegetables with a tangy taste.

  3. Make a lime zest substitute: If you don’t have fresh lime zest, you can substitute it with lemon zest or lime essential oil.

Lime zest is a versatile ingredient that can take your cooking to the next level. However, if you want to take it even further, consider using lime essential oil. It’s a highly concentrated extract that can add a potent lime flavor to your recipes.

Essential Oil

Moving on from discussing lime zest, let’s talk about the essential oil that can be extracted from this citrus fruit. Lime essential oil is typically obtained through a distillation process that involves steam passing through the peel of the lime. This process allows the volatile compounds found in the peel to be separated and collected, resulting in a concentrated and potent oil.

Advertisement

Lime essential oil is known for its refreshing and uplifting aroma, making it a popular choice for aromatherapy. It is believed to have a variety of benefits, including reducing stress and promoting mental clarity. In addition to its aromatherapy benefits, lime essential oil can also be used in household cleaning products due to its antibacterial properties. Overall, lime essential oil is a versatile and valuable ingredient that can be incorporated into a variety of daily routines.

As we move forward to discussing how lime can be used for household cleaning, it’s important to note the various benefits of using natural ingredients in our cleaning products.

Household Cleaning

Using natural ingredients for household cleaning can be a refreshing and eco-friendly alternative to harsh chemicals. Not only do homemade cleaners save money, but they also reduce exposure to toxic chemicals commonly found in commercial cleaning products.

Here are some natural alternatives to consider:

  • Baking soda: Known for its gentle abrasive properties, baking soda can be used to scrub surfaces like sinks and bathtubs.

  • Vinegar: A versatile cleaner, vinegar can be used to disinfect surfaces, remove stains, and deodorize rooms.

  • Lemon juice: With its acidic properties, lemon juice can be used to remove stains and freshen up surfaces like cutting boards.

  • Castile soap: Made from vegetable oils, castile soap is a gentle and effective cleaner that can be used on a variety of surfaces.

Incorporating these natural alternatives into your cleaning routine can be a simple and effective way to reduce your environmental impact while still maintaining a clean home.

Advertisement

When it comes to making homemade cleaners, lime juice can be a great addition to your arsenal. However, not all lime varieties are created equal in terms of juice yield and flavor.

Let’s take a look at some lime varieties to try and the characteristics that make them stand out.

Lime Varieties to Try

You’ll wanna give these lime varieties a taste test to see just how much juice they can produce!

Some popular varieties include Key limes, Persian limes, and Bearss limes. Key limes are smaller and more tart, with a distinct aroma that pairs well with cocktails and desserts.

Persian limes are larger and milder in flavor, making them a great choice for savory dishes and marinades. Bearss limes are seedless and juicy, with a slightly sweet taste that is perfect for making limeade or squeezing over seafood.

Advertisement

It’s important to note that lime taste and seasonality can vary depending on the region they were grown in and the time of year. For the most flavorful and juicy limes, try to purchase them when they’re in season.

To get the most juice out of your limes, roll them firmly on a hard surface before cutting them in half. This’ll help break up the pulp and release more juice.

Now that you have your freshly squeezed lime juice, let’s talk about how to store and preserve it for later use.

Storing and Preserving Lime Juice

To keep your lime juice fresh and flavorful, it’s important to store it properly. One way to do this is to freeze the juice. Simply pour the juice into an ice cube tray and freeze until solid.

Once frozen, transfer the cubes to a resealable plastic bag and store in the freezer for up to six months. This method not only preserves the juice, but also makes it convenient to use in small portions for recipes or homemade limeade.

Advertisement

Another method for preserving lime juice is to make homemade limeade. This is a great way to use up excess juice and enjoy a refreshing drink at the same time. To make limeade, simply mix the juice with sugar and water to taste, and serve over ice.

This drink can also be stored in the refrigerator for up to a week. By following these simple steps, you can ensure that your lime juice stays fresh and ready to use whenever you need it.

Frequently Asked Questions

Can lime juice be frozen for later use?

Yes, lime juice can be frozen for later use. It has a shelf life of about 6 months in the freezer. To freeze, squeeze the juice into an ice cube tray and store in an airtight container. Thaw as needed.

How long does lime juice last in the fridge?

Did you know that lime juice can last up to 2 weeks in the fridge? To properly store leftover juice, transfer it to an airtight container and refrigerate. Use it in dressings, marinades, or cocktails.

Can lime juice be substituted for lemon juice in recipes?

I’ve found that lime juice can be substituted for lemon juice in recipes without significant changes. However, the benefits of lime juice differ from those of lemon juice due to differences in their nutritional profiles and flavor profiles.

Advertisement

Does the size of a lime affect the amount of juice it yields?

As a bartender, I’ve noticed that the size of a lime affects its juice yield. Smaller limes tend to have a higher acidic content, which can impact the flavor of a drink. However, on average, one lime yields about 1-2 tablespoons of juice.

What are some common cocktails that use lime juice as an ingredient?

As a bartender, I know that lime juice is a key ingredient in many Margarita variations, such as the classic and frozen versions. Non-alcoholic lime drinks, like limeade and virgin mojitos, also rely on the tart and refreshing flavor of lime juice.

Conclusion

So, how much juice does one lime make? After conducting research and experiments, I can confidently say that the answer varies.

The amount of juice a lime produces depends on several factors such as its freshness, ripeness, size, and juiciness. However, on average, one lime can yield around 1-2 tablespoons of juice.

While it may seem like a small amount, lime juice packs a punch of flavor and health benefits. It can elevate the taste of your dishes and cocktails, aid digestion, boost immunity, and even prevent scurvy.

Advertisement

So, don’t underestimate the power of this tiny citrus fruit. Next time you’re using lime juice, remember to follow the tips for getting the most juice out of it and try out different lime varieties to find your favorite.

Continue Reading

Juice Tips and Tricks

How Much Juice Do You Get From One Orange

Published

on

By

Did you know? A medium-sized orange typically yields about 1/4 to 1/3 cup of delicious juice! However, the amount of juice extracted may vary due to various factors.

As someone who enjoys freshly squeezed orange juice, I’ve always been curious about how much juice I can get from one orange and what affects the yield. In this article, I will delve into the factors that influence orange juice yield and share tips and techniques for maximizing juice extraction.

Orange juice is a popular beverage worldwide, and for good reason. Besides being refreshing and delicious, it is a rich source of vitamin C and other nutrients that are beneficial for our health. However, not all oranges are created equal, and some may produce more juice than others.

By understanding the factors that affect orange juice yield and using the right tools and techniques, you can get the most out of your oranges and enjoy a glass of freshly squeezed orange juice anytime. So, let’s explore the world of orange juice and discover how much juice you can get from one orange!

Key Takeaways

  • The amount of juice obtained from one medium orange can range between 1/4 to 1/3 cup, depending on ripeness, juicing technique, and type of juicer used.
  • Blood oranges have a higher juice yield due to their higher acid content and thinner membrane, while navel oranges have a thicker membrane resulting in lower juice yield.
  • Oranges are a popular source of vitamin C, potassium, and folate, and can be used in cocktails, marinades, dressings, and smoothies.
  • While orange juice contains antioxidants and fiber, it also has drawbacks such as high sugar content, acidity, added sugars, and limited fiber, and should be consumed in moderation.

Factors Affecting Orange Juice Yield

The amount of juice you can get from one orange is affected by various factors. For instance, the ripeness of the fruit is a significant determinant of the juice yield. When the fruit is too ripe, it may become soft, which reduces the amount of juice that can be extracted. On the other hand, an unripe fruit may not produce enough juice because it doesn’t contain enough water. Therefore, it’s essential to choose oranges that are ripe but not overly soft or firm to get the best yield.

Another factor that affects the amount of juice you can get from an orange is the juicing method used. Some juice extraction methods are more efficient than others, which can affect the yield. For instance, hand-squeezing an orange may not yield as much juice as using an electric juicer. However, it’s important to note that the type of juicer used also plays a significant role in the yield.

Advertisement

Thus, it’s recommended to use a high-quality juicer that’s designed to extract every last drop of juice from the fruit. With these factors in mind, let’s explore how much juice you can expect from one orange.

How Much Juice Can You Expect from One Orange?

I’ve always wondered how much juice I can get from one orange.
It turns out that the average yield for a medium-sized orange is about 1/3 cup or 80ml. However, there can be variations in yield depending on factors such as the variety of orange, its ripeness, and the juicing method used.

Additionally, when compared to other citrus fruits, oranges tend to have a higher yield than lemons or limes but a lower yield than grapefruits or tangerines.

Average Juice Yield

Usually, an average orange yields about a quarter cup of juice. However, juice extraction can vary depending on the type of orange and juicing techniques used. To give you a better idea of the juice yield for different types of oranges, here is a table showing the average juice yield for three popular varieties:

Orange Variety Juice Yield (in cups)
Valencia 1/3
Navel 1/4
Blood Orange 1/2

As you can see, blood oranges produce more juice compared to other varieties. This is because they have a higher acid content and a thinner membrane, which makes it easier to extract the juice. On the other hand, Navels have a thicker membrane, resulting in a lower juice yield.

Advertisement

Moving on to the next subtopic, while the average juice yield for oranges is about a quarter cup, variations in yield can occur due to several factors.

Variations in Yield

Juice yield can fluctuate depending on factors such as ripeness, juicing technique, and the type of juicer used. When it comes to ripeness, a fully ripe orange yields more juice than an underripe or overripe one. Juicing technique also plays a role, as squeezing the orange by hand may not extract as much juice as using a juicer. Lastly, the type of juicer used can affect the amount of juice extracted.

A centrifugal juicer may extract more juice but with more pulp, while a masticating juicer may extract less juice but with less pulp. Orange varieties can also affect the amount of juice extracted. For example, navel oranges are known to have more juice than Valencia oranges. Additionally, blood oranges have a unique flavor but may yield less juice due to their thicker skin.

Despite these variations in yield, oranges are still a popular choice for juice extraction due to their high vitamin C content and refreshing taste. In comparison to other citrus fruits, oranges may not yield as much juice as a grapefruit or lemon, but their mild sweetness and versatility make them a popular choice for juicing.

Comparison to Other Citrus Fruits

When it comes to citrus fruits, the saying "when life gives you lemons, make lemonade"highlights the popularity of lemons for their tart flavor and high juice yield. However, there are other citrus fruits that are just as versatile when it comes to cooking and juicing.

Advertisement

Oranges, for example, are a great source of vitamin C and have a sweet and tangy flavor that makes them perfect for juicing. Grapefruits, on the other hand, are known for their bitter taste, but they are also a great source of antioxidants.

Citrus juice varieties differ not only in flavor but also in juicing techniques. Oranges and lemons are relatively easy to juice, with many households using a simple hand-held juicer or even just squeezing the fruit by hand. However, extracting juice from grapefruits can be more challenging due to their thick rind and tough membranes. Using an electric juicer or a specialized citrus press can be helpful in maximizing juice yield.

Nonetheless, when it comes to comparing juice yields, it is important to consider not only the fruit variety but also the juicing technique used. Tools and techniques for maximizing juice yield can make a big difference in how much juice you get from one orange or any other citrus fruit.

Tools and Techniques for Maximizing Juice Yield

By using a citrus reamer, you’ll be amazed at the amount of juice you can extract from a single orange! This tool is specifically designed to extract the maximum amount of juice from citrus fruits. Simply cut the orange in half, and press the reamer into the flesh of the fruit, twisting and turning as you go. The juice will flow out of the fruit and into a bowl or container below. Not only does this technique maximize juice yield, but it also ensures that you get every last drop of juice from the fruit.

To further maximize juice yield, you can also try using a juicer or squeezing the orange by hand. However, these methods may not be as effective as using a citrus reamer. Additionally, the pulp that is left over after juicing can be used in a variety of ways, such as adding it to smoothies or using it in baking recipes. By using these juice extraction techniques and finding alternative uses for orange pulp, you’ll be able to get the most out of every orange you purchase.

Advertisement

When it comes to choosing the best oranges for juicing, there are a few tips to keep in mind.

Tips for Choosing the Best Oranges

Now that we know the best tools and techniques for maximizing juice yield, let’s talk about how to choose the best oranges for juicing. It’s important to keep in mind that the quality of the oranges you use will directly affect the amount of juice you can extract.

When selecting oranges, consider their seasonal availability and whether they are organic or conventional. Seasonal oranges tend to be sweeter and juicier than out-of-season ones, so try to purchase oranges during their peak season, which is from December to April. Additionally, organic oranges may have a more intense flavor and higher nutrient content than conventionally grown ones, but they may also be more expensive. Ultimately, it’s up to your personal preference and budget to decide which type of orange to use.

When it comes to storing oranges for maximum juice yield, there are a few things to keep in mind.

Storing Oranges for Maximum Juice Yield

To ensure optimal juice extraction, it’s crucial to properly store your oranges. Here are some juicing techniques and orange storage methods that I use to get the most juice out of my oranges:

Advertisement
  • Store oranges in the refrigerator: Keeping oranges in the fridge not only increases their shelf life, but also helps to retain their moisture content. Cold oranges are easier to juice and yield more juice than those kept at room temperature.

  • Roll oranges before juicing: Rolling oranges on a hard surface like a countertop or cutting board helps to break down the cell walls inside the fruit. This makes it easier to extract the juice and results in a higher yield.

By using these simple tips, I’ve been able to get the most out of my oranges and enjoy their delicious juice.

Now that we’ve discussed how to maximize juice yield, let’s move on to the next step of using leftover orange pulp.

Using Leftover Orange Pulp

After juicing your oranges, don’t throw away the leftover pulp! Instead, try using it in a variety of creative ways to add flavor and texture to your dishes. You can make orange pulp muffins, orange pulp vinaigrette, or even orange pulp ice cream. Incorporating leftover orange pulp into your recipes not only reduces waste, but also adds a unique twist to your meals.

In addition to adding flavor and texture, orange pulp is a great source of fiber. Just one orange contains about 3 grams of fiber, and much of that fiber is found in the pulp. So, by using leftover orange pulp in your recipes, you’re also increasing the nutritional value of your dishes.

Now, let’s move on to the next section and talk about the nutritional benefits of orange juice.

Advertisement

Nutritional Benefits of Orange Juice

If you’re looking for a refreshing and nutritious way to start your day, consider pouring yourself a glass of freshly squeezed orange juice. Not only is it delicious, but it also provides numerous health benefits.

For example, orange juice is an excellent source of vitamin C, which is essential for a healthy immune system. Additionally, it contains potassium, which helps regulate blood pressure, and folate, which is important for proper fetal development.

But the nutritional value of orange juice doesn’t end there. It also contains antioxidants, such as beta-carotene and flavonoids, which can help protect against chronic diseases like heart disease and cancer. Furthermore, orange juice is a good source of fiber, which can aid in digestion and promote feelings of fullness.

So, if you’re looking for a healthy and delicious way to start your day, consider adding fresh orange juice to your breakfast routine.

While orange juice has many health benefits, it’s important to note that there are also potential drawbacks to consuming it. In the next section, we’ll explore some of these potential concerns and discuss how to mitigate them.

Advertisement

Potential Drawbacks of Consuming Orange Juice

Hey, hold up! Before you gulp down that glass of orange goodness, let’s take a look at some of the possible drawbacks of consuming orange juice. While orange juice does provide a wealth of nutrients, there are some health concerns to consider.

  1. High sugar content: Orange juice is naturally high in sugar, which can lead to weight gain and increase the risk of developing type 2 diabetes if consumed in excess.

  2. Acidic: Orange juice is also highly acidic, which can erode tooth enamel over time and contribute to acid reflux.

  3. Added sugars: Many store-bought orange juices have added sugars, which can negate the health benefits of the fruit and lead to further health problems.

  4. Limited fiber: Orange juice lacks the fiber found in whole oranges, which can lead to digestive issues and a less satisfying sense of fullness.

Despite these potential drawbacks, orange juice can still be a healthy part of one’s diet when consumed in moderation.

Now, let’s move on to the next section where we’ll explore some creative uses for orange juice.

Creative Uses for Orange Juice

I love orange juice, and I’m always looking for creative ways to use it in my cooking and drinks. One great way to use orange juice is in cocktails, where it adds a bright, tangy flavor to classic drinks like mimosas and screwdrivers.

It’s also great in marinades and dressings, where the acidity helps tenderize meat and adds a zesty kick to salads.

Advertisement

And of course, orange juice is a staple ingredient in smoothies and shakes, where it adds natural sweetness and a burst of vitamin C.

Cocktails

Cocktails are a great way to enjoy the delicious flavor and juice from one orange in a refreshing and boozy way.

There are many orange juice mixing recipes out there, but some of the best cocktails with orange juice include the classic Screwdriver, the Margarita, and the Tequila Sunrise.

The Screwdriver is a simple yet satisfying drink made with vodka and orange juice, while the Margarita adds a bit of lime and tequila to the mix.

The Tequila Sunrise is a beautiful and fruity drink made with tequila, orange juice, and grenadine, creating a sunrise effect in the glass.

Advertisement

Not only do these cocktails taste great, but they are also easy to make at home with just a few ingredients.

Simply mix together the desired amounts of orange juice, alcohol, and any additional ingredients, and serve over ice.

These cocktails are perfect for a summer day or a night in with friends.

Now, let’s move on to the next section about marinades and dressings.

Marinades and Dressings

Marinades and dressings can add a burst of flavor to any dish, and using freshly squeezed orange in them can give a tangy sweetness that perfectly complements the savory ingredients. Here are some of my favorite ways to incorporate orange juice into my marinade recipes and dressing variations:

Advertisement
  • Whisk together orange juice, soy sauce, honey, and garlic for a delicious Asian-inspired marinade for chicken or beef.
  • Mix orange juice, olive oil, and balsamic vinegar for a citrusy salad dressing that’s perfect for summer.
  • Combine orange juice, lime juice, and cumin for a zesty marinade for grilled shrimp or fish.
  • Add orange juice, Dijon mustard, and honey to a basic vinaigrette for a sweet and tangy dressing that goes well with roasted vegetables.
  • Mix orange juice, olive oil, and red wine vinegar for a bold and refreshing marinade for lamb chops or steak.

Using freshly squeezed orange juice in marinades and dressings is a simple and easy way to elevate any dish. But orange juice isn’t just for savory recipes! In the next section, we’ll explore how to incorporate orange juice into smoothies and shakes.

Smoothies and Shakes

Now that we’ve learned about marinades and dressings, let’s talk about something a little sweeter: smoothies and shakes! As someone who loves to start their day with a nutritious and delicious drink, I’m excited to share some of my favorite smoothie recipes and the health benefits they offer.

Smoothies are a great way to pack in a lot of nutrients in one convenient drink. By blending together fruits, vegetables, and other ingredients like yogurt or nut butter, you can create a tasty and satisfying beverage that’s also good for you.

Some popular smoothie ingredients include spinach, kale, bananas, berries, and avocado. Not only do these ingredients provide essential vitamins and minerals, but they can also help boost your immune system, improve digestion, and promote healthy skin.

So why not try blending up a smoothie for breakfast or as a mid-day snack? Your body will thank you!

Frequently Asked Questions

Are all varieties of oranges the same in terms of juice yield?

Comparing orange varieties, juice yield differences can be significant. Like different breeds of dogs, each has unique characteristics. Valencia oranges, for example, tend to yield more juice than navel oranges.

Advertisement

Can you substitute bottled orange juice for fresh orange juice in recipes?

I’ve found that you can substitute bottled orange juice for fresh in recipes, but it may affect the taste and texture. To maintain the best flavor, use fresh juice and consider adjusting other recipe components to accommodate the difference in liquid. Some recipe tips include using a citrus press to increase juice yield and selecting oranges that are heavy for their size.

How does the age of the orange affect the amount of juice it yields?

The age of an orange can affect its juice yield variability due to factors affecting juice extraction such as the amount of pulp and moisture content. This variability may impact the amount of juice obtained from an orange.

What is the best way to clean juicing tools after use?

Cleaning juicing tools after use is important to prevent bacterial growth. Effective disinfectants like vinegar or hydrogen peroxide can be used for eco friendly cleaning. It’s best to clean the tools immediately after use to prevent buildup. As for a rhetorical device, let’s start off with a pun: "Juice gotta be kidding me if you’re not disinfecting your juicing tools!"

Is it better to juice oranges with or without the peel?

When juicing oranges, it’s better to remove the peel to avoid bitterness. However, the peel contains nutrients and fiber that can benefit the body. Juicing may decrease some nutritional value, but still provides vitamins and hydration.

Conclusion

Well folks, after all that research and experimentation, it turns out that you can only get so much juice from one orange! Despite our best efforts to maximize yield with fancy tools and techniques, the reality is that oranges have a finite amount of juice inside them. Who knew?

Advertisement

But fear not, my fellow orange enthusiasts. Just because we can’t squeeze every last drop out of each fruit doesn’t mean we can’t enjoy the delicious, nutritious juice that we do get. And let’s not forget about the creative uses for orange juice – whether you’re making a marinade, a cocktail, or just adding a splash to your morning smoothie, there are endless possibilities.

So while we may not be able to magically conjure up gallons of juice from a single orange, let’s appreciate what we can get and savor every sip. And who knows, maybe one day we’ll discover a way to extract even more juice from our beloved citrus fruits.

Until then, let’s raise a glass (of orange juice, of course) to the simple pleasures in life. Cheers!

Continue Reading

Trending